Sunday, April 29, 2012

Freezer cooking wrap-up

I thought I'd update you on my freezer cooking day last Friday.

I had one of those days where although I was home thinking I would be cooking I ended up having a million things to do so I didn't do as much as I planned but:

Thursday
- made extra Spinach stuffed shells (1 meal for the freezer)
Friday
- made a Middle Eastern Flourless orange cake for a function on Saturday.
- poached 1kg of chicken breasts
- used 1kg of mince/beef to make 50 meatballs
- used .5kg of mince/beef to make a Cheeseburger and Fries casserole (recipe to follow)
- used .5kh of mince/beef to make browned beef with onion (when I need it I can add to spaghetti sauce or taco seasoning for a fast dinner.
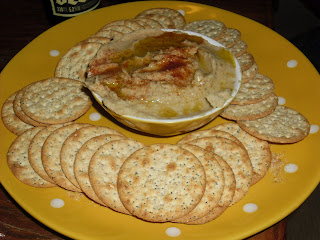
- roasted eggplant and used it in Eggplant and White Bean Hummus

Sunday
- turned poached chicken into a Chicken and Mushroom Pie and a Chicken and Asparagus Pie (recipe to follow)
- made chicken salad for school sandwiches

All in all not a bad effort.


Pies ready for the oven.

Saturday, April 28, 2012

What to do with 3 Japanese eggplant or eggplant hummus

On Friday in the midst of a big cook-up I found 3 sad looking Japanese eggplant in my fridge.

I decided to throw them in the oven with a little olive oil and roast them.

When my husband arrived home and announced he hadn't had lunch and would like a snack I remembered reading a recipe of eggplant and white bean hummus on the Giarda De Lorentiis page over on the Food Network.

I didn't check the recipe I just threw the ingredients in the food processor and blitzed it.

I guess I remembered it pretty well because mine was exactly the same except I served it with crackers. You can visit the site for the recipe.

http://www.foodnetwork.com/recipes/giada-de-laurentiis/white-bean-and-roasted-eggplant-hummus-recipe/index.html


Thursday, April 26, 2012

Spinach and ricotta stuffed shells

When my daughter was young I used to make this dish a lot. It's a great meal to make ahead and freeze. it's also a great vegetarian option if you are having a buffet or a party.

For some reason the shells themselves became hard to find. So I stopped making it. I use the same filling in cannelloni but cannelloni doesn't go as far as when it's in the shells.

Anyway I found a version of them at Harris Farm Markets the other day and they were two bags for$6.
Considering each bag makes 2 trays or enough to feed about 6 people that's still pretty good value.

I don't usually price food out on this blog but this is a great dish for a party or for feeding lots of people cheaply.

Here's how I'd do it for entertaining a group:

1 wheel of ricotta $8.99
2 bags pasta $6
3 boxes frozen spinach $2.70
1 bag shredded mozzarella $5
1 bag shredded Parmesan $4
2 eggs $1
herbs & garlic
Spaghetti sauce 4 jars or big batch homemade $4

Total: About $32 that would feed 24 people, maybe more...or $1.33 a serve. Add some bread and salad and that is some bargain entertaining.

I happened to buy silver beet fresh and use that this time but that's more work and I wouldn't do that for a group.

Spinach and ricotta stuffed shells
1 bunch silver beet, stems removed and finely chopped
1 500g bag pasta shells
500g ricotta
1 cup Parmesan
2 garlic cloves
1 onion diced
teaspoon mixed/Italian herbs
1 egg
2 jars spaghetti sauce
1 cup mozzarella cheese
2 baking dishes lightly sprayed with oil.(I used one regular and a foil one to freeze the second batch)

1. Place silver beet, garlic, herbs and olive oil in a large sauce pan and stir fry till wilted.
2. Combine ricotta, egg and Parmesan in a large bowl. Stir in wilted silver beet.
3. Spoon ricotta mix into shells and place filled shells in a single layer in baking dishes.

4. Put spaghetti sauce in large saucepan and dilute by rinsing jars with hot water to get all sauce out. When warm pour over shells. You want the shells submerged.
5. Sprinkle with mozzarella. (can be frozen at this point).
6. Bake in a moderate oven 30-40 minutes. (You can tell it's done when you can stab a knife through the shells).
7. Serve with a nice salad.

Enjoy!


Wednesday, April 25, 2012

Seafood Chowder


As parents we did something wrong along the way. From an early age our lovely daughter used to walk into a restaurant and say "Do they serve crab here" or to direct quote "Does this place serve crab?"
Our response "not on the children's menu kid."
Having said that we want to encourage her to eat diverse foods but seafood, especially shellfish can be pretty pricey. One way around this is to buy Marinara mix (I think Americans call this mixed seafood). It usually contains shrimp, salmon, calamari rings, a white-fleshed fish and mussels.
I use it for pasta marinara and in seafood pies. It's great for a seafood pizza topping. 
The easiest way is in a seafood chowder. I made one for lunch this week.
Seafood Chowder
olive oil and butter to cook (You need butter or the soup won't thicken)
1 onion diced
1 carrot diced
2 celery sticks diced
1 teaspoon dill
1 garlic clove crushed
6 small potatoes or 3 large potatoes diced
1 tin corn
1/3 cup flour
3 litres of seafood stock (can use chicken if you like)
500g Marina mix
1/2 cup cream
1. Heat butter and oil in pan and then add next 5 ingredients. Cook 5-10 minutes until onion translucent.
2. Add corn and flour and stir till combine, making sure flour well distributed.
3. Add stock to cover veggies (if not covered add water). Cook till veggies soft.
4. Turn off liquid and add seafood. Leave 10 minutes and it will poach in soup mix.
5. Use a stick blender to puree to preferred consistency - you may like it smooth or a bit chunky like traditional chowder.
6. Return to the heat till hot and stir through cream. Season to taste.
Enjoy!

Tuesday, April 24, 2012

Preparing for a big freezer cooking session

There are lots of blogs and websites out there with advice about freezer cooking. Lots of them emphasise the concept of Once a Month Cooking (OAMC).

I have to say if I worked full-time out of the home I think I would embrace this concept pretty enthusiastically. If no one gets home till 5pm or 6pm then I can see having a pre-made meal defrosted and ready to heat up makes perfect sense, especially when you also have to juggle homework, family time, baths, walking the dog, laundry and who knows what else.

As it stands I work from home so things are a bit different and with a bit of planning I can pull something together. Last night I was home at 5.45pm and we were eating a lasagna by 6.45pm because the meat was defrosted and I had noodles and a jar of sauce.

Anyway, the point is I still like having meals in my freezer, maybe not a month's worth but enough to get you out of an emergency and avoid take-away. (This month we have to work around new clients, my self-publishing a book, my husband being extra busy at work, my daughter changing her schedule and me attending the Sydney Writers' Festival for two days.)

The easiest way to tackle this method is to ask yourself a few basic questions.

1. What do we like to eat? Honestly there is no point making bulk casseroles if no one will eat them.
2. Is it worth the effort? Does it save me money?  For example I find it is easier and often cheaper to buy pre-made burger patties at the supermarket so I'm not going to waste my time making those babies.
3. What can I half-do to get dinner underway? What if you bag some chicken breasts in marinade - great to grill for salads, stir fry, kebabs? What if you make a double batch of pizza dough and freeze half? What if you make double batches of bolognese or meatballs (you don't have to make the lasagna  but you can then turn the sauce into lasagna, stuffed potato, baked pasta etc pretty quickly).
4. How much of something do you want to eat?  Don't make 10 litres of pumpkin soup if you will get bored with it before it's gone.
5. What ingredients do you have that need using? Extra eggs = quiche or zucchini slice. Extra potatoes might be twice baked potato or a potato-topped fish pie.
6. How can I make it easier? What about a recipe mix for the crock pot to make curry? Or a cook-in-sauce for a pasta bake?
7. What am I putting the end product in? Make sure you have containers and freezer-space or it's all just pointless.

Freezer cooking is an exercise in making your life easier. So look at it from that perspective. I never do all ground beef/mincemeat or all chicken or all ham because that doesn't help me we don't like the repetition. Look at your family, what you like, what your needs are and how you can make your life easier.

Those are a few tips. Do you have any special techniques for this style of cooking.


Monday, April 23, 2012

Easy wonton soup or why I love the Chinese grocery store


Today I was at my local shops and popped into the local Chinese grocery. I love it there because it has different foods and lots of things we use day to day like vermicelli noodles, 2 minute noodles, Asian sauces and even some sweet treats at great prices.

I was thinking about making some soup so I had a look in the freezer cabinet and found some great little wontons. Two little containers for $6 was a bargain so i grabbed them and with 5 ingredients made a yummy wonton soup.

Easy wonton soup
1 container of chicken wontons
1 container chicken consomme
1 pack 2 minute/ramen noodles (minus seasoning)
1 bunch baby bok choy washed and chopped
soy sauce

1. Bring consomme, soy sauce and 2 cups water to the boil.
2. Add wontons and cook for 6 minutes.
3. Add 2 minute noodles cook 1 minute. Add bok choy and cook 1 minute.


Enjoy!

Sunday, April 22, 2012

Open topped ratatouille pie

This is a recipe I adapted from The Australian Women's Weekly pies and tarts cookbook which doesn't seem to be in publication any longer. I know I have had my copy for at least ten years but it was published in 1999.

Regardless I didn't follow their recipe exactly, more the spirit of it. Basically I had Japanese eggplant,  a red capsicum, zucchini and cherry tomatoes I needed to use up so I decided a ratatouille of some sort was in order so I made that up and then I went in search of some pastry.

This recipe  as is is vegetarian. We didn't, but you could easily add some bacon to the mix or even some mozzarella on top for a more pizza-like pie.

Open topped ratatouille pie.

Ratatouille/Filling
6 Japanese eggplant or 1 large eggplant diced
2 cloves garlic, crushed
1 cup mushrooms, quartered
1 zucchini chopped
1 red capsicum/pepper
1 green capsicum
1 cup cherry tomato
1/2 onion chopped
1 120g tin tomato paste
1 tin diced tomato
1/2 cup water
1 teaspoon Italian seasoning (or mixed herbs)

1. Heat olive oil in a large pan. Add eggplant, onion, garlic, capsicums, mushrooms, herbs and saute about 10 minutes. (I like my eggplant and peppers to char/blacken a little).
2. Add zucchini and cherry tomato and cook another 2 minutes.
3. Add tomato paste and brown off. Then add tinned tomatoes and water. Leave to simmer while you make pastry.
Before the tomato was added


Pastry
2 1/4 cups plain flour
200g cold butter
3 egg yolks (reserve 1)
2 tablespoons approx, cold water.
poppy seeds for decoration
1. Add flour and butter to a food processor and process. Add 2 egg yolks and enough cold water for the pastry to come together in a ball.
(You can do this by hand. First rub butter into flour and then add yolks and water till pastry combines).
2. Wrap in plastic wrap and chill in fridge for 30 minutes.

To assemble
1.Roll pastry into large circle. Can be rustic/uneven.
2. Lift into greased pie plate allowing a large over-hang.
3. Fill with ratatouille. Then fold pastry over the top leaving a hole in the centre.
4. Brush with egg yolk, sprinkle with poppy seeds and bake in hot oven 40 minutes.

Enjoy!


Saturday, April 21, 2012

Stuffed Mushroom Sandwich

Today I am a bit bored. It is an overcast Sunday, my husband is working and my daughter is busy doing her own thing. I could be writing an article, working on my new author website, working on a friend's website or even editing a book. I am however doing none of those things.

When lunch rolled around my daughter made herself a tuna salad sandwich so that just left me.

I decided to do something different. I often have mushrooms on toast for lunch. I saute them in some butter with fresh rosemary. Very yummy.

Today I had a large Swiss Brown mushroom so I decided to keep it whole and made this Stuffed Mushroom Sandwich.

Stuffed Mushroom Sandwich for One
1 large mushroom (Portabello, Swiss Brown or regular)
50g smoked cheese
1 slice ham
salad greens
mayonnaise
2 slices wholemeal bread toasted.

1. Heat the panini press or sandwich grill. (I don't have one but a George Foreman grill would work too)
2. Remove stem from mushroom and insert cheese and top with ham. (You could leave out ham if you are vegetarian)
3. Close press and cook about 5 minutes until cheese is gooey.
4. Assemble sandwich by spreading mayo on bread, tom with mushroom and greens.

Enjoy!

Sundried Tomato Baked Ricotta

Today I am going to visit a friend for afternoon tea who is gluten intolerant. I seem to know an increasing number or coeliacs and people with gluten intolerance.

This particular friend can have a little gluten but I try to avoid it. I don't happen to keep rice flour or gluten free flour on my shelf because there is no need for me to in general. I managed to make this particular friend's birthday cakes the last two years without it. One was that eternal classic the flourless chocolate cake and the other Middle-Eastern orange cake.

Today however I thought I had a recipe for cookies that used almonds and no flour but I remembered incorrectly and alas it uses flour. I can't tell you how much I don't want to make another run to the grocery store or even the corner store today. It's school holidays, it's super wet out there and I am trying to get some work done as well.

So to the fridge I went and found a tub of ricotta. So then I thought of doing a baked ricotta. I looked to see what ingredients I had an decided on this super simple dish.

Sundried Tomato Baked Ricotta

250g of ricotta
1 egg (beaten)
1 tablespoon of sundried tomato pesto
salt and pepper to taste.

1. Place all ingredients in a bowl and whisk together until smooth.
2. Spray a 1 cup ramekin with oil and pour in the ricotta mix.
3. Place on a baking tray and bake in a moderate oven (180C) for 40 minutes.
4. Allow to cool in ramekin then turn onto a plate and serve with crackers (rice in our case) and crudites (carrots, celery and capsicum in my case).

Enjoy!


Tuesday, April 17, 2012

Peanut butter choc-chip cookies


As we all know these days allergies are everywhere. Most primary schools in our state have a nut-ban for the very simple reason that for the one or two kids at the school with a severe allergy that exposure to nuts is a matter of life or death. No one wants their snacks to send another child to hospital.

Of course if you like to bake this eliminates quite a lot of popular foods. Now of course with so many children being gluten free and almond meal being used as a substitute for flour in lots of their recipes well it does kind of make your head spin.

Right now it is school holidays which is good news for my husband who LOVES nuts. So that he and my daughter can have the same snacks in their lunch I leave nuts out of lots of my recipes during the term much to his dismay. This vacation we have no plans to catch-up with any kids with a nut tolerance so today I made Peanut butter choc-chip cookies.

Having just had a couple he declares them "the best cookies you have made in a long time."

Peanut Butter choc-chip cookies (makes 24 cookies)
1 cup peanut butter
125g butter (room temperature)
1 cup firmly packed brown sugar
1 egg
1 1/3 cups plain flour   
1/2 tsp baking powder
1/3 cup roughly chopped roasted peanuts (I used salted)
1/3 cup choc chips

Optional 100g dark cooking chocolate.

1. Prehat oven to 180C and line 2 trays with baking paper.
2. Beat peanut butter and butter in a large bowl until smooth. Add brown sugar and beat till combines. Beat in the egg until incorporated.
3. Sift together flour and baking powder and add with nuts and choc chips. (You could freeze dough or 1/2 the dough at this point).
4. Roll tablespoons full and place on tray about 4cm apart. Flatten into small discs.
5. Bake in oven for about 12 monutes. Let sit 5 minutes before transferring to a wire rack to cool.They will harden a little when cooled but still be soft in the centre.

Optional: Melt dark chocolate and drizzle over cookies when cooled.

Sunday, April 15, 2012

A trip to the Organic Markets


Produce from the local markets


Today my daughter and I made a trip to our local Organic Markets at Frenchs Forest.


To be honest I don't buy all that much that is organic, some things not others. All the produce is grown by and sold by small farmers so I feel like it's fresh and being sourced from the supplier regardless.

Today's list included:
- organic twiggy sticks
- organic dog treats (Not sure Skip knows the difference honestly)
- two buckets of baby grape tomatoes
- lettuce
- hummous (My food processor is about to die and be replaced. Grinding chickpeas would be it's death-knell).
- avocado
- Japanese eggplant
- basil
- a sour dough breadstick
- saffron linguine


What do I plan to do with all this? Good question.

The hummous will go to dinner at a friend's house, as will some twiggy sticks on a plate of nibbles.
My daughter will inhale the tomatoes as snacks, we'll use the rest in salads and pasta dishes.
I made some Italian tuna salad which I had on sour dough for lunch using some basil and cherry tomatos too. (I took a very arty photo on the camera and then the batteries died mid-way and it wasn't saved. So annoying!)
I'm not sure about the Japanese eggplant. They are great to stuff but these ones are a bit bent so I may just make some rattatouile or maybe http://mysydneykitchen.blogspot.com.au/2012/01/eggplant-sichuan-style.html
I think the linguine will be yummy with a seafood pasta sauce so I will investigate that as well.

It was a nice time wandering about getting a coffee and my daughter got gozleme for her and a friend who was coming over for lunch - which they completely devoured. I really must make my own gozleme as well. They aren't hard but the dough needs time to rise you need to plan ahead. Not always my strength.

Anyway I think it is lovely to have markets nearby to explore and it is a very pleasant way to support small growers and fill in a Sunday morning.


Saturday, April 14, 2012

Taco Meat

Today my lovely husband is out in a fishing competition. Apparently they are to target Flathead today. It is a competition organised in support of Prostate Cancer so he gets to fish and help someone. That's all good. Lucky for him it's a nice Autumn day out there.

None of that of course guarantees that he will be bringing home any fish. We hope so of course. Also he is fishing with a mate who has a family. Will there be enough fish for seven? Will they be all coming here for dinner? Will we be going to their place? None of these things really bother the fishermen.

So I am going to make a lovely trip to the nearby Organic Markets with my daughter shortly and then I will come home and make taco meat and throw it in the slow cooker. If needed I can make tacos for seven. If not I can freeze it.

So what are some great ways to use taco meat:


Obviously tacos.


Burritos
© Eperceptions | <a href="http://www.stockfreeimages.com/">Stock Free Images</a> & <a href="http://www.dreamstime.com/">Dreamstime Stock
Photos</a>


  • Mexican Lasagna (layer taco meat inbetween tortillas and top with cheese)
  • Mexican crepes 
  • Taco salad
  • Taco cupcakes
  • Nachos
  • Mexican Mac and cheese - mix taco meat through macaroni cheese
  • Mexican baked potato - topped with taco meat, cheese and sour cream
  • Tamale Pie
Tamale Pie
What other ways can you think of to use taco meat?


Thursday, April 12, 2012

Surprise pizza bites

Do you love Pinterest? I totally do.
It's such a fun way to wander through other people's homes and kitchens and thoughts even to see what people like.
When I first went on Pinterest I couldn't believe how many types of foods were being made in mason jars. You can now add to that food made in plastic cups for individual serves such as Mexican dip or individual desserts. This is such a great idea for parties - if you are a super patient person who is really going to go through and layer seven types of dip into fifty plastic cups and add corn chips or if you only have less than ten people at your parties. That idea rocks if that's the case.
Another idea that is popular which I love is the "cupcakes" in the won ton wrappers - taco cupcakes, lasagna cupcakes and tequila shrimp cupcakes. I totally love these for parties and look forward to making them.

Somewhere along the line I am pretty sure I saw pizza bites on Pinterest. Although I now can't find them there but here is a link:
http://annies-eats.com/2010/02/01/pizza-bites/

And I then saw this version which is what I tried to replicate today with a twist:
http://www.jasonandshawnda.com/foodiebride/archives/7195

However when I started to fill the bundt tin it became clear my dough wasn't going to stretch far enough so...we switched back to a pie plate but used a recipe closer to the 2nd one. Are you with me?

We like the following things on our pizza - ham, salami and mushroom. So I used baby bocconcinni which I halved and then we put either a piece of ham or salami or a quarter of a mushroom in the dough ball so each one is a surprise. Hence the name...

Surprise Pizza Bites
1 quantity pizza dough
6 mushrooms quartered
50g ham
50g salami
about 1/2 a tub or 100g baby bocconcinni
1 clove garlic crushed
50g butter melted.
Italian herbs (you could use dried basil or oregano instead)
Pasta sauce for dipping


1. Grease a pie plate with combined melted butter and garlic.
2. Take marble-sized dough balls, flatten then and then place salami/cheese, ham/cheese or mushroom/cheese inside. (You can see this is when my daughter and I were still on the bundt pan concept).

3.Pinch closed. Brush with butter and place in dish until done. Brush with extra butter and sprinkle with Italian herbs.


4. Let rise for 20-30 minutes while oven heats.
5. Bake in moderate oven about 30-40 minutes until golden.

6. Let sit 10 minutes and serve with warm pasta sauce for dipping.


Enjoy!

Tuesday, April 10, 2012

Pizza dough

I posted about home-made pizza a while back so I thought now I would post my pizza dough recipe.

I must confess that I stick pretty much to the recipe but my lovely husband likes to ad-lib a bit so sometimes the fluffiness of the dough varies according to his mood. We have cooked this dough in the oven and on the BBQ. We have made mini pizzas, large rectangle pizzas to feed a crowd and also done our usual 2 round pizzas for our family. We have doubled this recipe to with no negative side-affects.

What I do know matters about making pizza dough (or any dough) is USE FRESH YEAST. If you think it isn't fresh, hasn't been stored properly or is past it's best then don't bother. The other thing I do when I use yeast is add it to warm water - I do this when making bread in the bread machine too - not BOILING water but warm, because it activates the yeast.

so here we go

Pizza Dough
1 1/2 teaspoons of yeast or one 7g sachet (that's how I buy it)
Pinch of sugar
1/4 cup lukewarm water
1/4 cup of flour
1/4 teaspoon salt
1 and 3/4 cups of flour
3 tablespoons olive oil
1/2 cup of water

1. Combine yeast, pinch of sugar, water and 1/4 cup of lour in a large bowl. Leave to proof for 10 minutes.
2. Add remaining ingredients and combine with a wooden spoon.
3. Turn onto floured work surface and knead 7-10 minutes until smooth and elastic. Dough should be smooth to the touch.
4. Place in an oiled bowl and turn to coat. Cover with plastic or a warm cloth  for 1 - 1 1/2 hours until doubled in volume. Now it is ready.

Enjoy!

Monday, April 9, 2012

Sleepover food

It's school holidays now and that means only one thing when you have a pre-teen daughter in the house. Sleepovers!

I'm not sure when every weekend and every school holiday/vacation night officially became sleepover nights for kids because that wasn't the case when I was a kid. We had pretty strict rules about what we could and couldn't do and there seemed to be an unspoken quote limit we all adhered to...I do remember the very strictly enforced rule "never ask for your friend to come over/sleep-over" in front of the other kid and/or their parents. Not sure when that one was retired but I will say it certainly isn't very active in my corner of Sydney.

Anyway one of the challenges of sleep-overs for me anyway is food. Some kids are pretty fussy - the list of what they don't eat is longer than the list of what they do. Other kids just have fairly limited taste/experience - "do you like fish?" and they say yes. Turns out they have only eaten it deep fried.

Do you remember that awkward feeling of being on a sleepover and not liking the dinner? How did you politely not eat the food? How did you deal with the hunger? I remember.It was awful. And given it's my natural inclination to feed people well I just don't want my lovely little house-guests feeling that way.

So sleepover food is an issue. Some of our popular options:
- burgers on the BBQ
- homemade pizza
- spaghetti and meatballs
- lasagna

Last week we did mini burgers (sliders for the US readers) and homemade sweet potato fries.

So what are your sure fire sleepover foods?


Sunday, April 8, 2012

Homemade lollygobbleblissbombs

Lollygobbleblissbombs are a packaged treat made up of caramel popcorn and nuts. They were big when I was a child in the 1970's and then they went off the market. They are up their with cool pops and french onion dip in my 1970's memories.

I think they lost their cool somewhere along the way or were replaced by more funky treats. They are available again at the supermarket now, after a hiatus I believe.

I began making them 3 years ago for my annual Christmas drinks party and they became a big hit. Last year I made some to go in my parents Easter treat bags and they loved it so I did it again this year.

Their bag this year contained coconut ice, Oreo truffles, giant freckles and freckle pops, rocky road and lollygobbleblissbombs.

I adapted a recipe I found here  http://www.taste.com.au/recipes/22345/honey+caramel+popcorn
because you do need lots of popcorn especially if you want the caramel not too thick (IE not thick enough to break your teeth).

Homemade lollygobbleblissbombs

Popcorn
1 cup of popcorn kernels
1/4 cup of oil (I honestly just cover the base a couple of millimetres deep.)
175g salted peanuts

Caramel
1/3 cup honey
2/3 cup Castor sugar
60g butter

1. Heat oil and one kernel in a large sauce pan. When the kernel pops add the rest of the popcorn. Keep saucepan moving until all popcorn popped. (Or make popcorn your usual way
2. Spread the popcorn on a large baking tray covered with baking or silicone paper. Sprinkle over peanuts and combine.
3. Meanwhile in a small saucepan combine caramel ingredients overheat and stir until sugar is fully melted. About 5 minutes.
4. Let caramel bubble for about another 7-8 minutes (I let mine go further this time than usual - I'll be honest caramel and the possible 3rd degree burns scare me - and it was extra extra good).
5. Carefully pour caramel over nut/popcorn mixture and leave to set (about an hour). Break into "bliss bombs".
Enjoy!


Wednesday, April 4, 2012

Giant chocolate freckles and freckle pops


All Australians know what a chocolate freckle is. For my American readers it's a chocolate button covered in sprinkles, usually about the size of a 5c piece.

A couple of weeks back I was at a swanky cafe at a nearby beach and they were selling giant chocolate freckles at $6 each and freckle pops at $4 each which totally reminded me that last year my daughter and I made my parents Easter grab-bags that included giant chocolate freckles. (And they loved them!) So I thought we would do it again.

This is a super simple thing to do with kids because:
a) it involves chocolate
b) it involves sprinkles
c) that's all you need. Well for freckle pops you need lollipop sticks or even paddle-pop/craft sticks but that's it.

Chocolate freckles and freckle pops
So here is everything you need.

A bag of chocolate melts (I used dark but when i do this again with my daughter we will make white chocolate ones as well).
Sprinkles (I used regular multicoloured but you could use pink ones or red ones or whatever).
Baking paper
Lollipop sticks/craft sticks (optional)

1. Trace circles on baking paper the size of the freckles you would like to make.

2. Melt your choc melts according to directions - I used the microwave for extra speed.

3. Cover the circles one by one with chocolate and add sprinkles.

4. If using sticks insert before sprinkles.
5. Place in fridge to firm up (about 1/2 an hour).
6. Package up or eat.


Other ideas:
- These are great for party favours or goody bags or cake stalls/bake sales.
- You can shape for a theme eg stars for fairy wands.
- I'm sure you could do carob ones if you have issues with chocolate.
- Vary type of chocolate and sprinkle colours.

Enjoy!

Tuesday, April 3, 2012

Cookbooks and magazines

In the age of the Internet people seem to think we can throw away our cookbooks and cooking magazines and just download our recipes. I regularly use the Internet to find recipes and let's face it I wouldn't be writing a blog (or for that matter about to publish a novel as an e-book) if I wasn't one to embrace the change.

For me however cookbooks tell a story of your life. (And I really hate to part with books. I adore books!)

This is my cookbook shelf. It isn't all my cookbooks because some are on coffee tables or on a different shelf but this gives you an idea. As you can see I didn't tidy it up to impress you!


On this shelf you will find a wide array of books that I have collected over the last twenty something years and they tell you alot about me and my culinary history. On that shelf you can see the Dean and Deluca Cookbook my sister gave me for my 30th birthday, the Marie Clair cookbook my mother-in-law gave me a few Christmases back and a number of Australian Women's Weekly cookbooks I have bought myself for their combines affordability and reliability.

You can also see the Taste of Oregon cookbook my friend Molly gave me when I spent 12 hours with her back in the early 1990's in Portland on my way to Boston to surprise a bride and groom for a wedding. (Who does that from Sydney? The answer is me!) That cookbook has some of my favourite recipes ever - including the best ever apple cake and several pies that I made for my daughter's Christening (Who invites 60 people to their child's baptism less just two months after the birth and caters the event and bakes seven pies? The answer is me!)

Jill Dupliex's Old Food is on the shelf. It's dust cover is faded and a little floury. That book has the best baked cheesecake you will ever eat. One of my closest friends and I took turns bringing it to dinner parties for several years. It was the make perfect make-ahead dessert for twenty-somethings who were likely to have had several glasses (or bottles) of something by the time dessert was served so simple service was essential.

Also on the shelf is a small recipe folder my bridesmaids put together for my kitchen tea. They sent each attendee a page from the folder to write a favourite recipe on and then compiled them. So I have recipes from old school and college friends, neighbours from my childhood and relatives.

The book contains three recipes hand-written my my paternal grandmother - Nanna Maureen. It's lovely to see her scrawly handwriting on the page especially now that she has passed. Here is her Vanilla Kirpels recipe.


I haven't even begun to tell you the stories about me that the many magazines...I guess that is another post.

Monday, April 2, 2012

Not tacos but tamale pie

My menu plan is as always a fluid document, more of a guide than a map I suppose.

Tonight we got home from clarinet lessons and I just didn't feel like honey mustard chicken. I did feel like tacos but I can't eat tacos without avocado and we didn't have one (most unlike us because we go though one or two a day but of course sometimes we run out).

So I thought Tamale Pie. We've had it before as in we had it four years ago. I did some googling and adapted a couple of recipes to suit my needs and ingredients.

Tamale Pie

1 cup cornmeal or polenta
2 cups chicken stock (real, bought or consomme or veggie stock)
1 teaspoon butter
1 cup grated tasty cheese (cheddar I suppose elsewhere)

1 onion, diced.
500g mince meat/ground beef
1 sachet taco seasoning (35g)
120g tinned corn
1 200g tin tomatoes
(If vegetarian you could substitute vegetarian chili).
Crust
1. Bring chicken stock to the boil and then over a low heat gradually add polenta in a thin stream stirring till smooth. When smooth and glossy stir in butter and then 3/4 of cheese. leave to cool a little.

Filling.
1. Soften onion in a little oil in a fry pan. Add mince/ground beef and brown. When browned add taco seasoning, tomatoes and corn. Let simmer 10-15 minutes.

Assembly
1. Spread 1/2 the polenta mix on base of casserole or pie plate.
2. Layer in filling.
3. Top with remaining polenta mix.
4. Sprinkle with reserved cheese.
5. Bake in moderate oven 40 minutes.

Serve with traditional taco toppings, chopped tomato, grated cheese, shredded lettuce, sour cream, jalapenos and of course avocado if you have it.

Note: You could add sliced jalapenos to the pie crust (I don't because I'm allergic to chili and end up with lips that look like I have had bad implants...not a good look).

Sunday, April 1, 2012

Menu and Easter planning

It's a short week with Easter and the end of the first school term. How it can possibly be April already I do not know.

My menu plan therefore is brief:
- Honey mustard chicken, brown rice and green veggies
- Steak sandwiches and onion rings
- Soup and homemade bread, baked apples for dessert
- Taco night

The weekend is still up in the air plan-wise but I do know we are having my folks and my mother-in-law on Easter Sunday.

I am thinking:
- seafood chowder
- BBQ leg of lamb with a pumpkin rice bowl and greens
- dessert

My daughter thinks she and I should make the dessert on the cover of this month's Australian Good Taste magazine which is a Chocolate Salted Caramel Cheesecake. It looks delicious but I am worried my mother-in-law will go into diabetic shock...so the jury is still out on that.
http://www.taste.com.au/good+taste/

We didn't go on a picnic!

It was just the most beautiful day in Sydney today. Magic. We could have gone on a picnic but instead we cycled over the Sydney Harbour Bridge for lunch at Circular Quay.

We ended up at Cruise Bar at the Overseas Passenger Terminal largely because I was separated from the bike riders and spotted a waterfront table in the shade that the bikes could park beside.
http://www.cruisebar.com.au/

Cruise Bar photos

We just had bar food fish and chips for my daughter which were delish, a burger for my husband and I had the grilled fish of the day which was a lovely piece of ocean trout. You can't beat the location and for bar food the prices are good. They also have share plates which I think would be lovely with out of town guests on a sunny afternoon.

We came home to the smell of lamb in the slow-cooker.

I love my slow cooker. I don't use it a whole lot really, maybe every ten days or so but for days like this I find it perfect. The whole set it and forget it nature of the beast is perfect for busy people.

So far I haven't made too many things that I would describe as 'gourmet' in the slow-cooker but for good family friendly meals it is hard to beat.

Some of my slow cooker favourites include:
- meatballs in sauce (A great way to serve them and keep them hot for a group)
- American-style pulled pork (recipe to follow)
- a whole roasted chicken - super simple and a quick way to do a roast
- beef "pot-roast" which is a great way to take a cheap/lesser cut of beef and make it tender
- corned beef or silver side - I must confess I am not a huge fan of this but my family loves it and I like the leftover sandwich meat we get for the week ahead.
- simple curries
- chicken stock
- soups